While planning for my kitchen renovation I got thinking about what type of accent wall I could do besides shiplap. Shiplap is super popular and I thought I should try something different. I already had shiplap in my bathroom and fireplace and didn’t want to over do it. But, every time I thought of another idea my heart kept drawing me back to my true love… shiplap! So… I decided to just follow my heart cause I knew that was what I really wanted in this space. I have no regrets, I love it. Since this is my third time putting shiplap up in my house, I feel like I have the process pretty much perfected. You know what they say, third time is a charm! I will walk you through step by step how to achieve this look in your own home!
In this post I will explain the faux/budget friendly way to put up shiplap. This way saved me a lot of money and I personally prefer the look of it compared to actual shiplap boards. I used actual shiplap on my fireplace. Installing those are fairly self explanatory, just costs more! Actual shiplap is a cleaner look. Faux shiplap adds more of a rustic/farmhouse feel and is way cheaper. Just depends on your preference!
Supplies:
- 1/4in 4x8ft plywood sheets
- Leveler
- Stud Finder
- Tape Measurer
- Pencil
- Jig Saw
- Sandpaper
- Nail gun with 2in finishing nails (hammer and nails work as well)
- Primer & Paint (I used Behr Ultra in Alabaster Eggshell)
The amount of plywood sheets you will need obviously depends on the size of your project. I needed 5 sheets for 2 walls in my kitchen. If you are like me and don’t have a table saw to cut your sheets into strips, Home Depot will do this for you! They are the best!! Load your sheets onto a big cart and find the nicest looking worker at home depot (lol) and ask him/her to rip your 4x8ft sheet of plywood into 6in strips. Each sheet of plywood will give you 8 strips. You can also choose a different thickness other than 6in if you want! In my bathroom I went with 8in and love the look of that as well. In my kitchen I went with 6in just because my ceiling planks are 6in and I wanted to keep that same look! Either way, doesn’t matter, totally up to you! When you get home with your boards you just want to make sure they are all smooth and sanded. Give them a rough sanding to ensure no one gets a splinter when touching your shiplap walls!
So now that you’ve gotten all of your supplies, you want to prep your wall or walls. Start by taking everything off the walls. This includes outlet, light switch plates, lighting fixtures, and vent covers. You want to start with a clean slate.
This next step is somewhat optional. Depending on the color of your shiplap, it is easiest to paint your wall that color first before applying the shiplap. Since there will be gaps between the boards, you will see the wall color and want that color to be the same as the boards. Now, I say this is optional because you could do this part at the end by using a brush to paint between the gaps, but in my opinion that is a pain in the butt. So for example my wall in my kitchen was a light blue, I just quickly painted it white before starting.
Next you want to find your studs. You are going to be nailing the boards into the studs to make sure they stay in place and are nice and secure. You can also use liquid nails on the back of your boards to make them extra secure. I’ve found that the liquid nails is not really necessary and just adds another step. If you nail into your studs those boards aren’t going anywhere. Plus, in 20-30yrs when shiplap isn’t cool anymore (I will dread that day) you will easily be able to take the shiplap down. So, once you find and mark all of your studs, trace your stud lines all the way down your wall. You want to trace your stud lines all the way down so that when you put a board over your stud marking you don’t loose of forget where your studs are. This will just make the process quicker for you in the end.
Next step you may want to just skip and say ehh I don’t need to do that, but I promise you you’ll wish you did it in the end! Here is where you want to check to make sure your ceiling/floors are level. If they are, well aren’t you lucky!! If they are just slightly off (like mine) you can slowly place your boards more and more level as you go down the wall. You can’t even notice in the end! But, it is important to check before you start so that you have a game plan and don’t have a huge crooked line in the end.
Ok now that all of your prep is done you are ready to start! Pick a corner to start in! I chose the left upper corner of my wall. I started with a full 6in by 8ft long board. I found a chair to stand up on, grabbed my board, checked to make sure it was level, then nailed twice into each stud. Boom your first piece is up!
Now my walls aren’t super long, so my next piece I needed to trim. I measured the length I needed and used my miter saw to make a nice clean cut. You can use any type of saw for this, which is why I only linked my jigsaw. When I did shiplap in my bathroom I only used my jigsaw to make cuts and I think it turned out great. At that time I didn’t have a miter saw. Work with what you’ve got. You don’t need all the fancy tools for this! Once you have trimmed the board to the right measurement, line it up nice and snug to the adjacent board, verify it is level again, then nail into place. A nail gun really will make this way easier, but again, for my bathroom I did not have a nail gun and just used good ole hammer and nails. Up to you and what you’ve got!
Now onto your second row. I used a paint stirrer stick as my spacer (you can also use 2 nickels taped together). I used the excess piece of plywood from the board I just trimmed as the first piece in my second row. This is because I want staggered seams. I made sure all of my seams between rows were at least 8in apart. Again this is a farmhouse feel. You could also not worry about this part and in the end use wood filler on all of the seams so that you don’t see any of the gaps in the boards at all. Totally up to you. But I like the rustic/farmhouse feel.
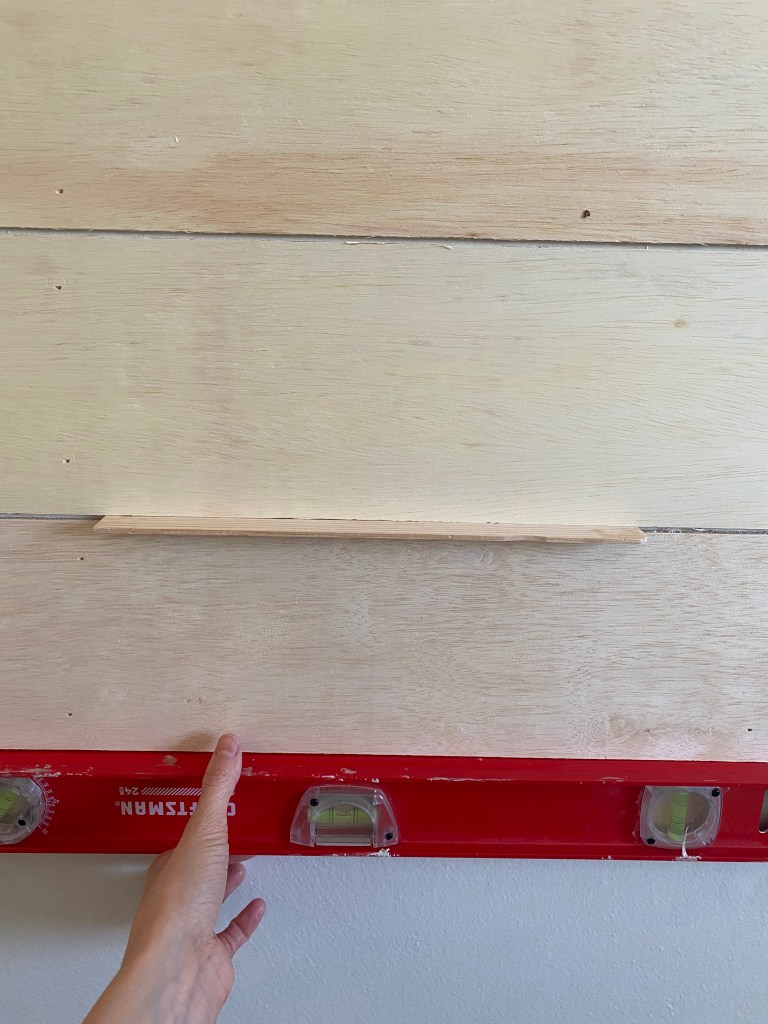
You will continue this process of using you paint stirrer as a spacer, ensuring your boards are level, nailing into the stud.
Eventually you may run into an obstacle. Such as an outlet for example. Don’t be freaked out you got this. So, for example if it is an outlet, you will need to cut that space out of your board. You will want to measure on your board where that outlet is. Make the markings on the board with your pencil then using a drill, drill through that spot to create a hole. Don’t be afraid to use a large drill bit, a big hole will make it easier to fit your jig saw blade into. Then using your jigsaw you can cut that spot out to fit over your obstacle! Simple, you’ve got this!
Those are the simple steps to applying the faux shiplap. Next you just need to prime and paint! I used 2 coats of primer, then 1 coat of Behr Ultra in Alabaster Eggshell. For my kitchen I also caulked at the ceiling and baseboards, it created a more finished look. Totally up to you, this is not necessary!
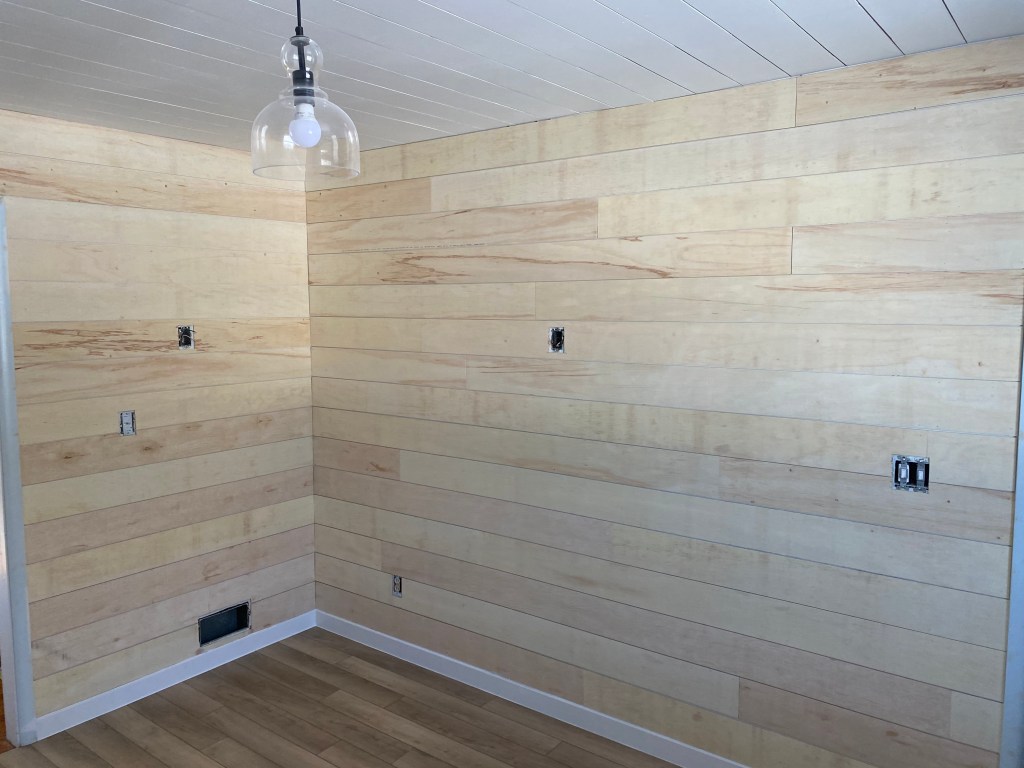

I just love how this faux shiplap turned out! Such a budget friendly and simple update that totally transformed my kitchen! If you have any questions please let me know! If you try this faux shiplap tag me on Instagram @abbbclark_homeee ! I would love to see how it turns out! My favorite part of this whole DIY world is meeting and interacting with new people and seeing others design inspiration and ideas! I just love it! Thanks for reading, XOXO!

Pingback: Abbbclarkhomeee